Git for beginners
Out of the different Source Control options Git is definitely the one most worth learning, however, it's also one of the most confusing.
With that in mind I'm going to add to the crowded market of "Git beginners" tutorials. Hopefully given that I can still remember the struggle of learning it and that my current level of understanding probably rates as "simpleton" this will be a useful tutorial.
I'm going to be writing for Git on Windows and will try to assume no existing knowledge beyond knowing what a file and folder is. Because of this I'm going to make a lot of oversimplifications.
Install It
Use the download link here or Google "Windows Git" and click the first link.
After using the installation defaults, you're done.
Where does it install?
Depending on which architecture version (x86/x64) you installed it will probably install in either C:\Program Files\Git or C:\Program Files (x86)\Git.
Launch It
Since using one of the nice user interfaces will only shield you from the true horror, it's best to start using console.
Search for "Git Bash" in your start menu or find it in the install location. Once launched you should see this window:
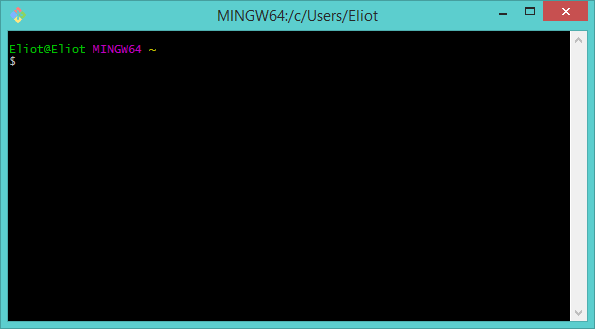
Depending on how comfortable you are with Window's command prompt you're either happy with what's going on, or the panic is already setting in.
Bash
Bash is effectively the Linux version of the command prompt from Windows. The command prompt is just a window which you type stuff into and things happen.
The dollar sign "$" is the prompt, it's asking you to write something on that line and when you hit enter it will run your command.
Let's start by working out where we are. Type the following command at the prompt:
pwd
And hit enter. You should see something like the following result:
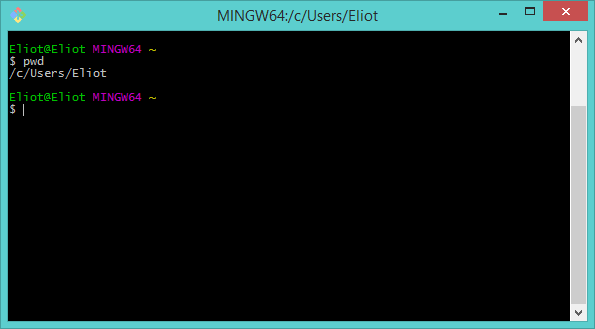
By using pwd (print working directory) we're able to see that our current command prompt (Bash) is pointing at "C:\Users\Eliot" (or your equivalent)
This is because Windows decided to be difficult and use a different way of showing folder and file locations to everyone else. Since Bash is like running Linux it uses forward slashes "/" instead of back slashes "\".Why does the file path look weird?
Now let's move somewhere useful.
Since I'm exceedingly lazy I like to store all my code directly on my C drive, rather than in my Users folder. I have a folder located at C:\code (for the sake of the tutorial you should create one too).
For navigating folders Git Bash uses the same command as Windows. cd -change directory. Go ahead and type the following command:
cd /c/code
Your console output should look similar to this:
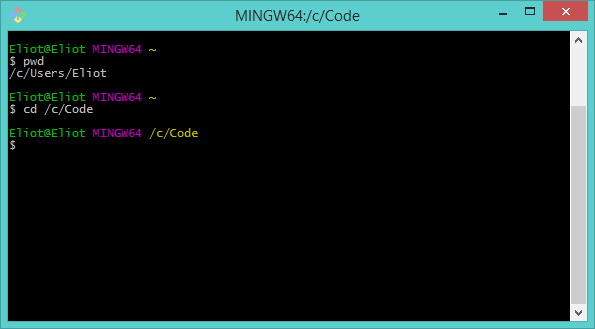
Notice how the yellow tilde character "~" above the prompt has changed to be "/c/code"? From this we learn that the yellow text shows us our currently active folder. To verify this you could type pwd and check it prints out "/c/code".
This also tells us that the "~" character has a special meaning. It corresponds to the base folder of the user's environment, mine is located at "C:\Users\Eliot".
So far we've not actually used any Git commands, these have been Bash commands. Git commands can are run through Bash.
Gitting Started
If you're still here after that terrible pun, it's time to actually do something with Git.
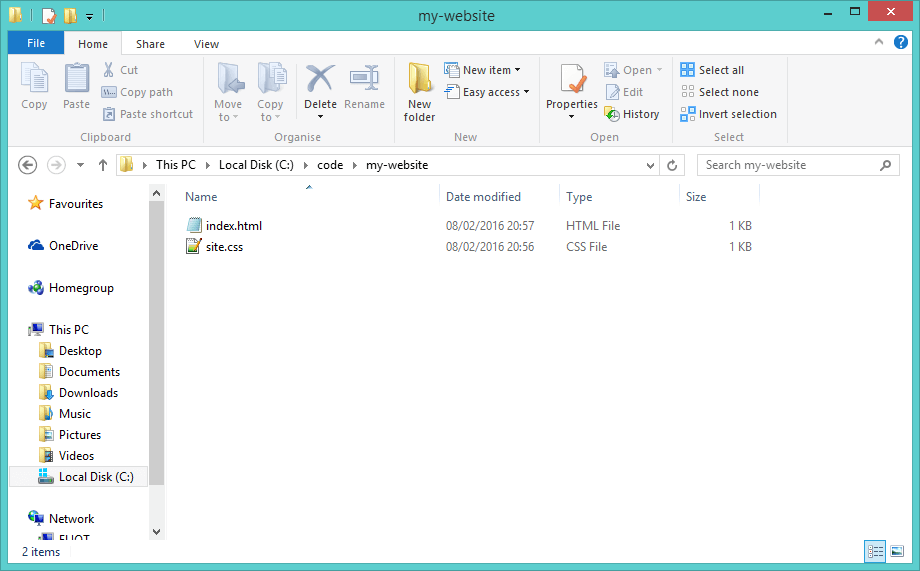
Let's create some code we might want to store under source control. For this demo I'm just going to make a project containing some static HTML and css.
In a new folder located at C:\code\my-website I made an html page and some css (index.html and site.css). Create the folder called my-website now and add these files. You can leave them empty for now if you don't know how to write html or css:
To prepare to use our first Git command, move into this folder using Bash. If your current directory is C:\code you can type:
cd my-website
Or to get to it from anywhere:
cd /c/code/my-website
Now for our first Git command, type:
git init
You should see the following output:
Initialized empty Git repository in C:/code/my-website/.git/
This is how we create a Git repository.
A Git repository is a basically a folder which is under source control.
If you look at the C:\code\my-website folder in Windows file explorer you should see a new folder called ".git" alongside your files. If you can't see it you may need to enable viewing hidden folders. This .git folder contains the files Git uses to track changes under source control. This makes it easy to delete a repository while keeping the files. All you need to do is delete the .git folder.
How does the repository work?
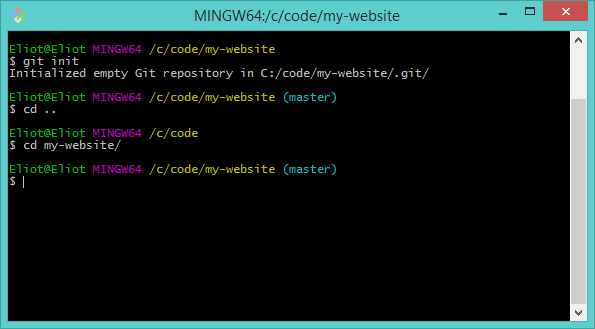
There's a new bit of information in the line above the prompt in Git Bash. After the current active path there's the word "master" in brackets. This is the current branch name.
Don't worry too much about branches for now, we'll get to them in a bit.
All we have to do to make our repository active in Bash is navigate to the folder containing the repository (or any folders under that folder). If we use the cd command to navigate up a level and then back into our my-website folder, we see the branch name disappears then reappears from the text above the prompt. The branch name only shows when we're in a repository. Try these commands:
cd ..
cd my-website
For an illustration of what you should see, look at the screenshot below:
Fear of Commitment
We've know that the Bash console shows us which branch is currently active when we're in a repository. Another way to get this information is the command:
git status
As well as printing the branch name this command also prints the status of files in the folder (repository):
On branch master

Initial commit

Untracked files:
  (use "git add <file>..." to include in what will be committed)

        index.html
        site.css

nothing added to commit but untracked files present (use "git add" to track)
This tells us we have 2 untracked files. An untracked file is one which isn't under source control. If we delete it, or mess it up in some way, Git isn't going to help us. With that in mind let's track it. As the output from git status helpfully suggests, we can use the following command:
git add
If you type just that statement you get the following output:
Nothing specified, nothing added.
Maybe you wanted to say 'git add .'?
The argument to git add is the path to the file or files you want to track. The '.' dot means "all currently untracked files". Let's use the following two commands to add the files and then check the status:
git add .
git status
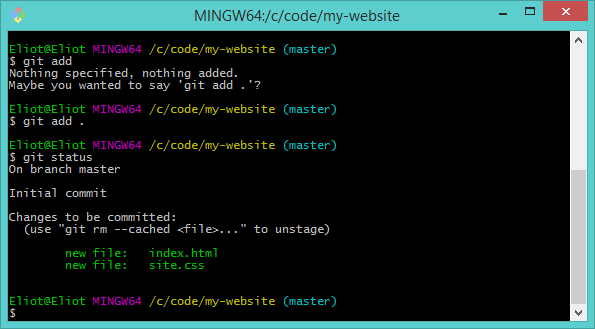
Our changes are now "staged" and we're ready to commit them. A commit is a snapshot of how all files in the project looked at a particular point in time. It's a bit like if we copied our project folder and renamed it "my-website-20160209".
Once you have a commit you can always go back to how the files looked when you made that commit.
This is an exciting moment for us, the first commit in our repository! The simplest way to make a commit is with the following command:
git commit -m "our first commit"
The -m option tells Git we will provide the message for our commit along with the command. This message can be anything; "toast", "tire iron", "updated tests to use mocks". It's just a friendly label we can use to remind people and ourselves what we did between this commit and the last one.
Now if we use git status we can see that nothing has changed in our repository since we made our commit.
Captain's Log
Now we've made a commit how do we view the commits in our repository? The answer is:
git log

The log lists all the commits in our repository with the latest at the top of the log. The long yellow word containing both numbers and letters is the hash of our commit. This is a unique bit of text which identifies our commit for Git commands.
From Logs to Branches
I mentioned earlier that the "master" in brackets tells us which branch we're on. Now we've got our first commit it's time to learn about branches.
A branch is a way of having multiple different sets of the same code which are changing in different ways. For example if you have a text file (file.txt) that both you and your friend Eric are editing, you might share a folder containing "file.txt, my-file.txt, eric-file.txt". This way you can work on your file, Eric can work on his and neither of you are going to irreversibly mess up the original file.
Every Git repository starts with a branch called "master". That's why, when you used the git init command, the active branch name was "master".
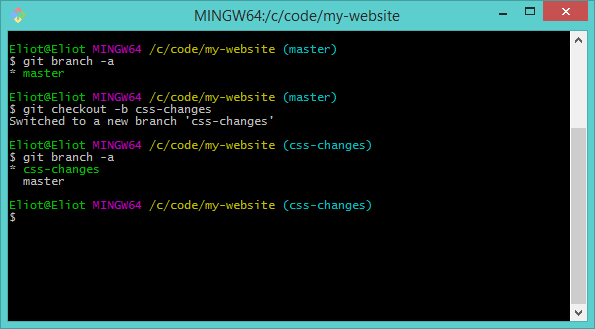
To see every branch in your repository you can type:
git branch -a
The -a option tells Git to list all branches. The output of this command is:
* master
The asterisk '*' shows which branch is currently active.
Now let's assume we want to change our files, but these are experimental css changes which we might throw away. To create a new branch:
git checkout -b css-changes
The -b option means this command will create a new branch, rather than moving between existing branches.
If you type git branch -a now, you'll see that there are two branches and the branch css-changes is active. The text above the bash prompt will also have updated:
If we use git log to check our commit history we can see it's the same as master. Creating a new branch from another branch will bring all the commits from the source branch.
Now to make some changes to a file update site.css to add some styles to it, for instance:
div{
    box-sizing: border-box;
}
Once you save these changes in your editor, type git status to see what's going on.
On branch css-changes
Changes not staged for commit:
  (use "git add <file>..." to update what will be committed)
  (use "git checkout -- <file>..." to discard changes in working directory)

        modified:   site.css

no changes added to commit (use "git add" and/or "git commit -a")
Git has detected that our site.css has changed. We need to use the git add command again to be able to commit the file. Use the following 2 commands:
git add .
git commit -m "css changes"
When we type git log we now see 2 commits in this branch.
After making this commit let's also change the index.html file. I added the line:
<iframe></iframe>
Now this was a mistake, iframes are bad. How do we undo this? If you type git status the output should say something like:
On branch css-changes
Changes not staged for commit:
  (use "git add <file>..." to update what will be committed)
  (use "git checkout -- <file>..." to discard changes in working directory)

        modified:   index.html

no changes added to commit (use "git add" and/or "git commit -a")
One option is to use git checkout -- index.html which will reset the file. However we could also reset everything to be like the last commit.
Reset
In order to reset our branch to be like the last commit we can (unsurprisingly) use git reset. First you need the hash of the commit you want to return to. Use git log and select the first 6-9 characters of the hash of the top commit in the log. For example my output is:
commit dd1f49b24a190c2c28e42a361e7e8ddaa697aab4
Author: Eliot Jones <elioty@hotmail.co.uk>
Date:   Tue Feb 9 19:00:33 2016 +0000

    css changes

commit 14eff26985b984143cadf32f1a3bd111f7f6c7e2
Author: Eliot Jones <elioty@hotmail.co.uk>
Date:   Tue Feb 9 18:38:32 2016 +0000

    our first commit
Your commit hashes will be different, select the first part of the top one. In my case the text I want is "dd1f49b". Next we can use a hard reset to get our branch looking like it was at the time of that commit:
git reset --hard dd1f49b
Note that the hard reset command is dangerous and you could lose work, it's generally better to use git checkout -- <file>.
Now if we type git status we can see that we have no changes in our branch.
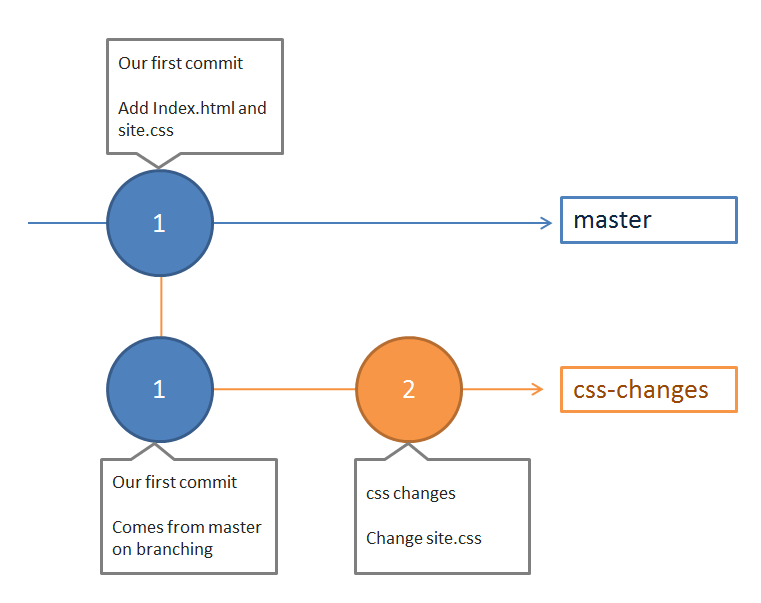
Recap
So far we've:
- Created our repository
- Made our first commit on master branch
- Branched from master to css-changes
- Made another commit on the css-changes branch
- Discarded some unwanted changes on the css-changes branch by rolling back to a previous commit
If we illustrate commits with circles and branches with lines, then our current branches and commits look like this:
The beauty of Git is we can go back to master branch and interact with our code as it looked before we made the commit to change the site css in our css-changes branch. To do this we don't even need to do a hard reset. Use the command:
git checkout master
This change your active branch and set your active view of the repository back to how the code looked in the master branch.
One of the things which differs in Git to other version control systems is that there's only ever a single version of a file on disk at a given time. Git doesn't store branches in separate folders, everything is stored in Git's database. This means that branching is an incredibly low cost operation, you can make many branches with no real memory or performance issues.
Where are the files in the css-changes branch?
Merge
Now we've verified we're happy with the code in our css-changes branch it's time to merge it into master. Generally you want to reserve master for completed "shippable" code. This means you merge into master when a commit (or series of commits) is ready to be used/deployed/released.
Given our current active branch is master all we have to do to complete the merge is enter the command:
git merge css-changes
Now one last time let's type git log to see our commit history:
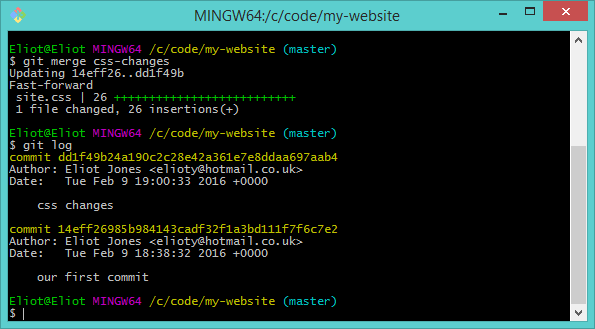
After the merge the changes from our css-changes branch have been brought into master. Effectively we've copied the commit from css-changes to master. We still have the css-changes branch, you can verify this using git branch -a.
The merge operation git merge <branch> will transfer any commits with different hashes from the branch passed as the argument to the currently active branch.
Wrapping Up
That concludes this post. In the next post we'll take a look at working with remotes, using GitHub as our example and also rebasing, merge-conflicts and more.
Feel free to point out any terrible errors or missing information in the comments.