vNext Setup
ASP.NET vNext is coming and despite the lack of fanfare around the announcement, it's a challenge to describe it without resorting to meaningless buzzwords like 'paradigm-shift'. While it's hard to pick which of the awesome features of vNext to celebrate most, to me the top features are definitely:
- Code changes without compile (courtesy of the, also hugely exciting, new compiler Roslyn).
- Cross platform ASP.NET in collaboration with Mono.
- Open Source, the entire vNext project is open source.
While I love code changes without compile as much as the next developer I think points 2 and 3 are the most exciting in terms of how Microsoft develop and release software in the future. The unprecedented level of transparency around these projects finally puts to bed the Microsoft vs. Open Source community disputes.
One of the best server side languages (ok, I use it for a job so I'm biased) is now available for all developers on all platforms, though this might lose Microsoft some licensing costs for Server OSes and Visual Studio licenses it also opens up the majority of servers (which are not running MS OSes) to ASP.NET (not to mention, who on earth chooses not to use Visual Studio if it's available). Scott Hanselman definitely describes all the new features better than I ever could, so head on over to his site to read more.
That's enough about why vNext is great. How do we actually get it up and running? The instructions on the Git Repository are probably the best on how to install.
Install Git
The vNext project is available as a Git repo, so in order to get it you need to have Git installed. Installing Git for Windows is extremely easy, thanks to these guys.
Once you have it installed, navigate to the appropriate directory (use 'cd' to change directory, just like command line) and type
git clone https://github.com/aspnet/Home.git
This should clone the repo to the correct directory, in my case I didn't change directory before clone and it copied to C:\Users\[Username]\Home
Install the KPM
KPM is used to manage and install the nuget packages for vNext. Inside the Home folder you should see 'kvminstall.ps1'. This is a Powershell script, Powershell is effectively the Windows command line but better.
Run Powershell, which for me can be found by typing 'Powershell' in the Windows 8 start
menu. If you cannot find it the .exe's are in C:\Windows\System32\WindowsPowerShell\v1.0 (for 32 bit) or C:\Windows\SysWOW64\WindowsPowerShell\v1.0
(for 64 bit), I used the 32 bit version. Remember to right click and 'Run As Administrator'.
Once Powershell has started you need to set your execution policy in order for the downloaded kvminstall script to run. To find out what
your current Execution Policy is type get-executionpolicy. If it's 'Signed' set it to 'RemoteSigned' by typing set-executionpolicy RemoteSigned.
Once this is done, double-click on the kvminstall.ps1 file and this will run the script. The script creates a new folder in C:\Users\[Username]\.kre containing the
'bin' folder with kvm.cmd and kvm.ps1 in (thus it's fairly simple to set up yourself if you have trouble with kvminstall). It also adds C:\Users\Eliot\.kre\bin
to the path.
To add something to the Path go to control panel -> system -> advanced system settings -> environment variables and add
C:\Users\Eliot\.kre\bin; to the User Variables -> Path.
Once installed either through the script or manually, open a new Powershell Window or Command Line (as administrator) and type
kvm list to make sure 'kvm' is a recognised command. Now you can retrieve the latest version by running kvm upgrade or retrieve a specific
version by typing kvm install 0.1-alpha-build-0519 (which was latest at time of writing). This installs files to the .kre\packages folder.
Having installed a version typing kvm list should show some installed versions as shown in this picture:
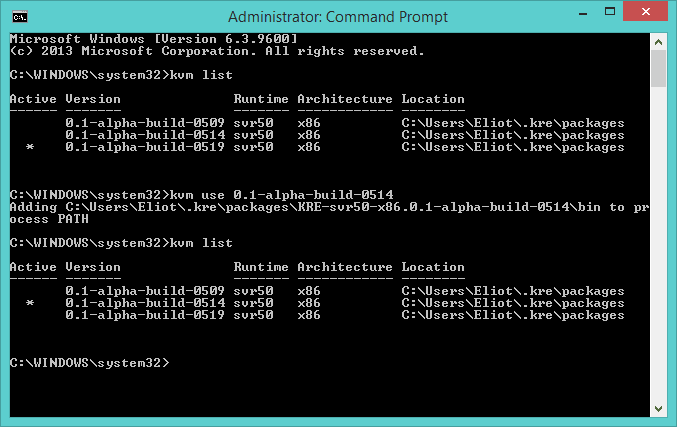
Type kvm use [version] as shown to swap versions.
Note - I was using BitDefender anti-virus and it stubbornly refused to allow kvm to install some versions, I disabled it when working with kvm and kpm.
Run the KPM and KRE
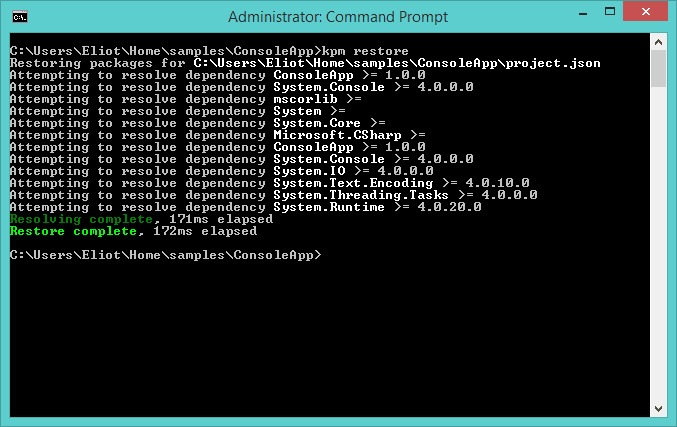
In the command line or Powershell navigate to C:\Users\[Username]\Home\samples\ConsoleApp and run kpm restore as shown below:
Once this has executed successfully you can now type k run and the Console will log 'Hello World' to screen.
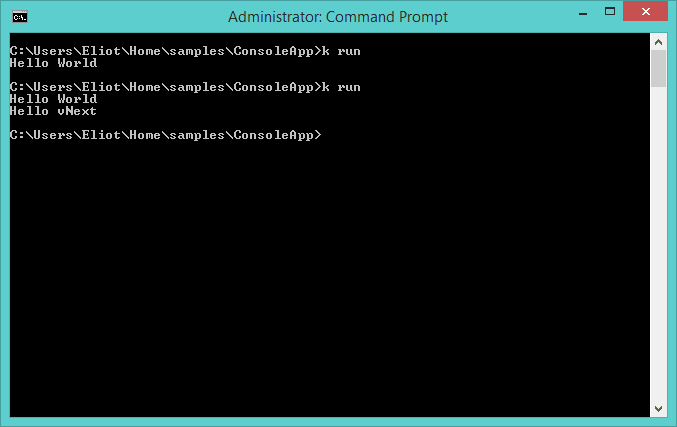
The magic of vNext/Roslyn can be seen here, if you now open Program.cs from C:\Users\[Username]\Home\samples\ConsoleApp and
add a new line, for example Console.WriteLine("Hello vNext"); then type k run the change happens straight away, without the
need to 'Build' in Visual Studio or any other compile steps.
Happy vNext-ing.